TM 55-1520-240-23-9
11-190
REMOVE SECOND STAGE MIXING ASSEMBLY
(Continued)
11-190
NOTE
Attaching bolt, washers, and nut will
be temporarily installed after removing
links and bellcranks.
NOTE
If a crack in the connecting links,
bellcranks, or supports is suspected
during removal, refer to TM
1-1520-253-23.
DISCONNECT FORWARD UPPER AND RIGHT
CONNECTING LINKS
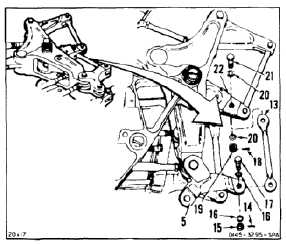
1.
Remove cotter pin (1), nut (2), washers (3), and
bolt (4) from forward left output bellcrank (5).
Disconnect forward upper connecting link (6)
from bellcrank. Install bolt, washers, and nut in
bellcrank.
2.
Remove cotter pin (7), nut (8), washers (9), and
bolt (10) from bellcrank (11). Disconnect right
link (12) from bellcrank. Install bolt, washers,
and nut in bellcrank.
REMOVE PITCH AND THRUST LEFT OUTPUT LINK
3.
Tag pitch and thrust left output link (13). Remove
cotter pin (14), nut (15), washers (16), and
bolt (17) from bellcrank (5). Disconnect link
from bellcrank. Install bolt, washers, and nut in
bellcrank.
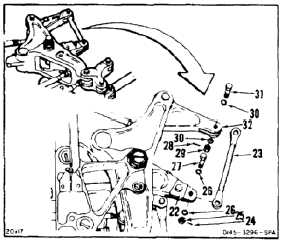
4.
Remove cotter pin (18), nut (19), washers (20),
and bolt (21) from forward input bellcrank (22).
Remove link (13). Install bolt, washers, and nut
in bellcrank.
REMOVE PITCH AND THRUST RIGHT OUTPUT LINK
5.
Tag pitch and thrust right output link (23).
Remove cotter pin (24), nut (25), washers (26),
and bolt (27) from forward input bellcrank (22).
Disconnect link from bellcrank. Install bolt,
washers, and nut in bellcrank.
6.
Remove cotter pin (28), nut (29), washers (30),
and bolt (31) from bellcrank (32). Remove link
(23). Install bolt, washers, and nut in bellcrank.
11-764