TM 55-1520-240-23-9
11-237
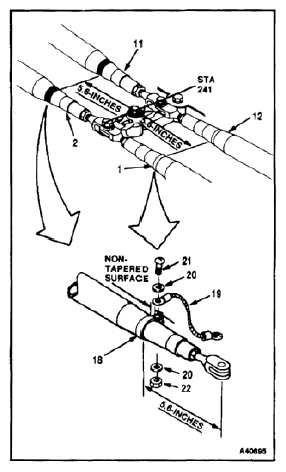
INSTALL TUNNEL CONNECTING LINKS
(Continued)
11-237
10.
Without 38 , if links (1, 2, 11, and 12) on forward
or aft side of sta. 241 are being replaced, install
loop clamp (18) on link as follows:
a.
Measure 5.6 inches from center of hole in
clevis end to non-tapered surface of links (1,
2, 11, and 12).
b.
Remove finish from links (1, 2, 11, and 12)
surface with fine grit abrasive paper (E11).
Make sure only finish is removed from link.
There shall be no removal of metal.
c.
Install loop clamp (18) in center of
non-tapered surface of links (1, 2, 11, and
12) as shown.
11.
Without 38 , install electrical lead (19), two
washers (20), bolt (21), and nut (22) on loop
clamp (18).
Alodine (E65) is an oxidizer. Discard
cloths which contain this material in a
seperate container. If discarded with
cloths contaminated with acetone,
MEK, or other organic solvents,
combustion can result. In case of
contact, immediately flush skin or eyes
with water for at least 15 minutes.
Get medical attention for eyes.
12.
Without 38 , apply brush alodine (E65) to loop
clamps (18) and all bare metal around clamps.
Allow to dry. Wear gloves (E184.1).
13.
Without 38 , apply epoxy primer (E292.1) to all
bare metal surfaces coated with alodine (E65).
Wear gloves (E184.1).
11-925