TM 55-1520-240-23-9
11-92
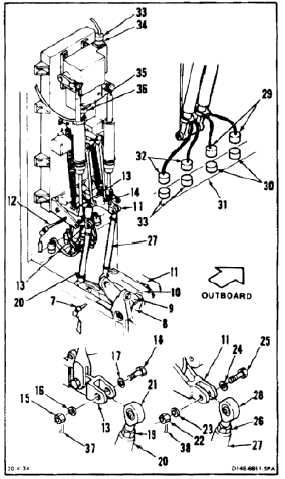
INSTALL CONTROL PALLET STA 120
(Continued)
11-92
3.
Install transfer bellcrank rig pin (T128) (7) through
four bellcranks (8, 9,10, and 11).
4.
Install pitch and roll rig pin (T134) (12) through
two bellcranks (13 and 14).
5.
Remove nut (15), two washers (16 and 17), and
bolt (18) from bellcrank (13).
6.
Loosen nut (19) of link (20). Turn rod end (21)
until link can be positioned in bellcrank (13) with
bolt installed loosely.
7.
Install bolt (18), two washers (17 and 16) and
nut (15) in bellcrank (13). Do not torque nut at
this time.
8.
Remove nut (22), two washers (23 and 24) and
bolt (25) from bellcrank (11).
9.
Loosen nut (26) of link (27). Turn rod end (28)
until link can be positioned in bellcrank (11) with
bolt (25) installed loosely.
10.
Install bolt (25), two washers (24 and 23) and
nut (22) in bellcrank (11). Do not torque nut at
this time.
11.
Connect two roll LVDT connectors (29) to
receptacles (30) on structure (31). Remove tag.
12.
Connect two pitch LVDT connectors (32) to
receptacles (33) on structure (31). Remove tag.
13.
Connect connector (33) to pitch CCDA (34).
Remove tag.
14.
Connect connector (35) to roll magnetic brake
(36). Remove tag.
15.
Torque two nuts (19 and 26) to 103 inch-pounds.
16.
Torque two nuts (15 and 22) to 30 to 45
inch-pounds. Install two cotter pins (37 and 38).
17.
Check two bolts (18 and 25). Bolts shall not
rotate with torque less than 10 inch-pounds.
There shall be no axial looseness, if bolts rotate
or are loose, add washer under nuts and repeat
step 16.
18.
Remove pin (12) from bellcranks (13 and 14).
19.
Remove pin (7) from bellcranks (8, 9, 10, and 11).
INSPECT
FOLLOW-ON MAINTENANCE:
Install roll, yaw, and thrust connecting links (Task
11-106).
Install DASH actuator (Task 11-164).
Remove servocylinder safety blocks (T31) (Task
11-29).
Perform operational check of flight controls (TM
55-1520-240-T).
Close closet backup panel (Task 2-2).
Install closet acoustic blanket (Task 2-108).
END OF TASK
11-492