TM 55-1520-240-23-6
7-214
DISASSEMBLE AND INSPECT UTILITY RESERVOIR/COOLER (AVIM)
(Continued)
7-214
14.
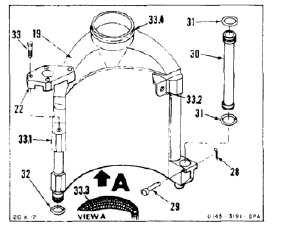
Remove cotter pin (28), pin (29), and return tube
(30) from cooler (19). Use 7/16 inch deep well
socket.
15.
Remove two packings (31) from tube (30).
Inspect tube. (Refer to steps 5.1 and 5.2.)
16.
Remove packing (32) from cooler (19).
17.
Drain fluid from cooler (19). Use container for
fluid. Use cloths (E120) to clean up spills.
18.
Remove bolt (33) and bracket (22) from cooler
(19).
18.1.
Check mounting flanges (33.1 and 31.2) of cooler
(19). Flanges shall not be bent.
18.2.
Check welds on cooler (19) for cracks. There
shall be no cracks. If a crack is suspected, refer
to TM 1-1520-253-23.
18.3.
Check fins (33.3) at bottom of cooler (19).
Straighten bent fins.
Heat will damage cooler.
18.4.
Check neck (33.4) of cooler (19) for cracks and
distortion. There shall be no cracks. Smooth
distorted neck back to original shape. Do not
apply heat. If a crack is suspected, refer to TM
1-1520-253-23.
18.5.
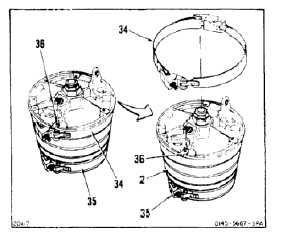
Check strap mounts (34 and 35). There shall
be no cracks or kinks. There shall be no broken
welds. If a crack is suspected, refer to TM
1-1520-253-23.
19.
If strap mount (34 or 35) is damaged, remove
as follows:
a.
Loosen one side of strap mount (34 or 35)
enough to clear timing clamp 36).
b.
Lift strap mount (34 or 35) to clear timing
clamp (36). Remove strap mount from
reservoir (2).
20.
Check reservoir (2) for condition. There shall be
no cracks or dents. If a crack is suspected, refer
to TM 1-1520-253-23.
FOLLOW-ON MAINTENANCE:
None
END OF TASK
7-814