TM 55-1520-240-23-6
7-133
INSTALL FORWARD SWIVELING SERVOCYLINDER
(Continued)
7-133
Antiseize compound (E75) can irritate
skin and cause burns. Avoid contact
with skin, eyes, or clothing. In case
of contact, immediately flush skin
or eyes with water for at least 15
minutes. Get medical attention for
eyes.
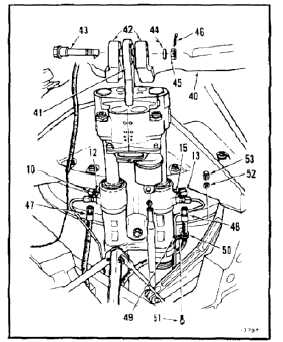
17.
Tilt swashplate (40) and position bearing (41)
between lugs (42). Install bolt (43), washer (44),
and nut (45). Coat shank of bolt and outside
diameter of bushing with antiseize compound
(E75). Do not get compound on thread of bolt.
Go to step 18. Wear gloves (E184.1).
18.
Torque nut (45) 400 to 660 inch-pounds
(includes cotter pin installation). A third
(AN960-816L) washer (44), may be required for
cotter pin alignment. Install cotter pin (46).
18.1.
Inspect installation (Task 7-123).
19.
Connect hose (47) to elbow (10). Tighten nut
(12). Remove tag.
20.
Connect hose (48) to elbow (13). Tighten nut
(15). Remove tag.
21.
Position clamp (49) on clamp (50). Install screw
(51), washer (52), and nut (53).
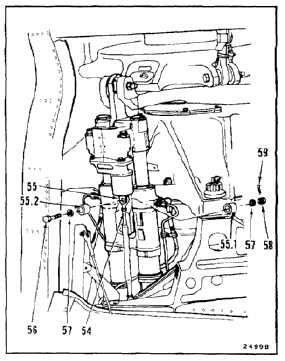
22.
Install inner bushing (55.1) and outer bushing
(55.2). Align link (54) with lugs (55). Install bolt
(56) with one washer (57) through bushings and
lugs, one washer (57) and nut (58).
23.
Torque nut (58) 30 to 45 inch-pounds. Install
cotter pin (59).
24.
Check bolt (56). Bolt shall not rotate with torque
less than 10 inch-pounds. There shall be no
axial looseness. If bolt rotates, or is loose, add
washer under nut. Torque and cotter pin nut
again.
7-600