TM 55-1520-240-23-9
11-20
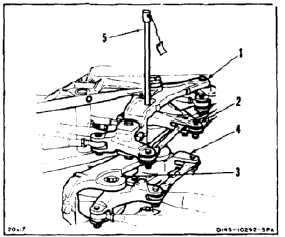
REMOVE DAMAGED RIG PIN FROM SECOND STAGE CONTROLS
(Continued)
11-20
1.
Move four bellcranks (1, 2, 3, and 4) while
turning and pulling up on second stage rig pin
(5). Remove pin. If pin is removed, perform step
9 then go to Follow-On Maintenance. If not,
perform steps 2 and 3.
2.
Cut pin (5) between fitting (6) and bellcrank (3)
close to bellcrank. Use hacksaw blade.
Do not damage other parts while
using hacksaw blade.
3.
Remove pin (5) from support (7). If pin is
removed, perform steps 8 and 9 then go to
Follow-On Maintenance. If not, perform step 4.
4.
Repeat steps 2 and 3 between four bellcranks (1,
2, 3, and 4) and support (7). If pin is removed,
perform steps 8 and 9 then go to Follow-On
Maintenance. If not, perform steps 5 thru 11.
5.
Cut head (8) from pin (5).
6.
Remove bellcranks (1, 2, 3, and 4) (Task 11-190).
7.
Drive sections of pin (5) from bellcranks (1, 2, 3,
and 4) and support (7).
8.
Pull section of pin (5) from fitting (6).
9.
Inspect second stage controls for damage (Task
11-18).
10.
Install bellcranks (1, 2, 3, and 4) (Task 11-191).
11.
Rig second stage controls (Task 11-51).
FOLLOW-ON MAINTENANCE:
Connect forward and aft servocylinder connecting
links (Task 11-193).
Remove servocylinder safety blocks (Task 11-29).
Perform neutral rig check (Task 11-33).
Perform operational check of flight controls (TM
55-1520-240-T).
Close forward left work platform (Task 2-2).
Install forward transmission aft fairing (Task 2-68).
END OF TASK
11-80