TM 55-1520-240-23-9
11-217
INSTALL FORWARD LCT YOKE
(Continued)
11-217
12.
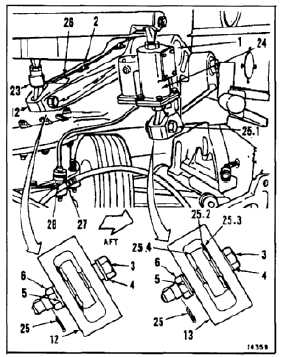
Raise yoke (1). Guide connecting link (23) into
lug (12) and actuator (24) into lug (13).
13.
Install recessed washers (4) on bolts (3), recess
toward head. Install bolts (3) dry, heads aft,
washers (5), and nuts (6).
14.
Torque nuts (6) to 290 to 660 inch-pounds.
Install cotter pins (25). An additional AN960-816L
washer may be used to align cotter pin.
Some clearance is required to ensure
that the LCT actuator lower end fitting
(25.4) is not clamped against the face
of the bushing flange (25.3).
14.1.
Check that actuator swivels at lower end-fitting
bearing (25.1). Any measurable clearance
between the actuator anti-rotation lugs (25.2)
and the bushing flange (25.3) on the yoke is
acceptable. If there is no clearance, add a thin
washer between the bearing inner race and the
flange bushing.
15.
Attach connecting link cable (26) to five mounting
plates (2) on yoke (1). Use cable straps (E375).
16.
Connect actuator connector (27) to receptacle
(28).
17.
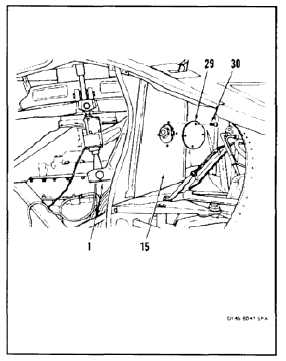
Install access plate (29) and four screws (30) in
bulkhead (15) aft of yoke (1).
FOLLOW-ON MAINTENANCE:
Connect forward rotor pitch links (Task 5-99).
Remove servocylinder safety blocks (T31) (Task
11-29).
Perform flight controls operational check (TM
55-1520-240-T).
Close forward pylon work platforms (Task 2-2).
END OF TASK
11-859


