TM 55-1520-240-23-9
11-51
RIG FIRST AND SECOND STAGE BELLCRANKS
(Continued)
11-51
27.
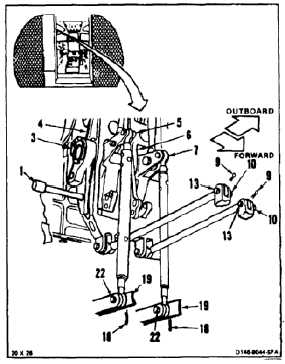
Working from passageway, torque four nuts (10
and 19) to 30 to 45 inch-pounds. Install four
cotter pins (9 and 18).
28.
Check four bolts (13 and 22). Bolts shall not
rotate with torque less than 10 inch-pounds.
There shall be no axial looseness if bolt rotates
or is loose, add washer under nut and repeat
step 24.
29.
Remove pin (1) from bellcranks (7, 6, 5, and 4)
and fitting (3).
INSPECT
FOLLOW-ON MAINTENANCE:
Remove DASH actuator dummy link (Task 11-27).
Install DASH actuator (Task 11-164).
Adjust cumulative stops (Task 11-52).
Remove copilot’s control stick yoke (T125) (Task
11-23).
Remove copilot’s yaw pedal rig pin (T127) (Task
11-23).
Remove copilot’s thrust rig pin (T122) (Task 11-23).
Remove copilot’s rigging fixture (T39) (Task 11-23).
Connect forward and aft servocylinder connecting
links (Task 11-193).
Remove servocylinder safety blocks (T31) (Task
11-29).
Perform operational check of flight control system
(TM 55-1520-240-T).
Install forward transmission drip pan (Task 2-3).
Close forward left work platform (Task 2-2).
Install closet backup panel (Task 2-2).
Install closet acoustic blanket (Task 2-108).
END OF TASK
11-221


