TM 55-1520-240-23-6
7-267.1
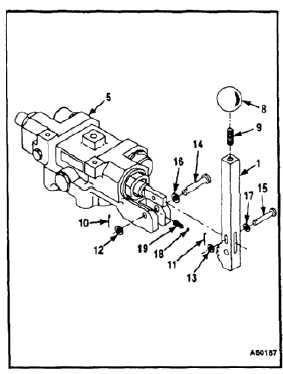
DISASSEMBLE AND INSPECT 145HS775 RAMP CONTROL VALVE
(Continued)
7-267.1
1.
Position handle (1) 90º to input piston (2).
2.
Remove safety wire from four seal glands (3),
and remove seal glands and four springs (4) from
valve body (5).
3.
Remove packings (6) and backup rings (7) from
inside valve body (5).
4.
Inspect seal bearing surfaces of each seal gland
(3). These surfaces must not be nicked, dented,
or scratched.
5.
Inspect seats inside valve body (5) that receive
packings (6) and backup rings (7). The seats
must be free of dents, nicks, or scratches.
NOTE
It is not necessary to remove knob (8)
if it is tight and secure on handle (1).
6.
Check security of knob (8) on handle (1). If
knob is loose, remove knob and check security
of set screw (9). If set screw is loose, proceed
as follows:
a.
Remove set screw (9), and check condition of
threads on set screw and inside handle (1).
Replace set screw if threads are damaged.
b.
Clean threads of set screw (9), handle (1),
and knob (8), with dry cleaning solvent
(E162). Threaded areas must be completely
clean of dirt, oil, and any foreign matter.
NOTE
Sealing compound (E342.3) takes
24 hours to cure. Cure time can
be reduced using locquick primer
(E295.1).
c.
Apply one drop of sealing compound
(E342.3) to threads of set screw (9) that
thread into handle (1).
7-974