TM 55-1520-240-23-5
6-32
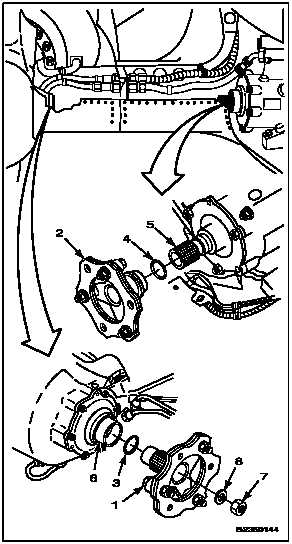
INSTALL ENGINE DRIVE SHAFT (Continued)
6-32
NOTE
Install left or right engine drive shaft in
same way. Right shaft shown here.
Installation of one-piece and riveted
shafts is similar. Differences are noted
text. Riveted shaft shown here.
INSTALL ADAPTER ASSEMBLIES
WARNING
Dry cleaning solvent (E162) is
flammable and toxic. It can irritate
skin and cause burns. Use only in
well-ventilated area, away from heat
and open flame. In case of contact,
immediately flush skin or eyes with
plenty of water for at least 15 minutes.
Get medical attention for eyes.
NOTE
On shafts (Without 51 ), shaft and
adapter assemblies are balanced
together and have the same serial
number. If any one is replaced, all
three must be replaced as a unit.
On shafts (With 51 ), shaft and
adapter assemblies may be replaced
individually.
1.
Clean splines of adapter assemblies (1 and
2), combining transmission input shaft (5), and
engine transmission output shaft (6). Use dry
cleaning solvent (E162) and cloths (E120). Wear
gloves (E186). Pack all splines with grease
(E190.1).
2.
Coat packing (4) with grease (E190.1). Install
packing on combining transmission input shaft
(5).
3.
Coat packing (3) with grease (E190.1). Install
packing on adapter assembly (1).
4.
Install adapter assembly (2) on combining
transmission input shaft (5). Wipe off excess
grease with cloths (E120).
5.
Install adapter assembly (1) in engine
transmission output shaft (6). Wipe off excess
grease with cloths (E120).
NOTE
If nut does not meet friction torque,
nut must be replaced.
6.
Coat thread of nut (7) with grease (E190.1).
Wear gloves (E186). Install washer (8) and nut in
adapter assembly (1). Check nut (7) for friction
torque of a least 7 inch-pounds. Torque nut to
120 inch-pounds.
6-103