TM 55-1520-240-23-5
6-31.1
REPAIR ONE-PIECE ENGINE DRIVE SHAFT (INSTALLED)
(Continued)
6-31.1
NOTE
Repair left or right engine drive shaft
in same way. Right shaft shown.
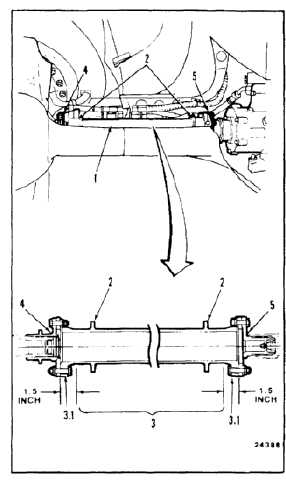
1.
Blend out nicks, scratches, and gouges on center
section (3) of shaft (1), including balance flanges
(2). Use abrasive pads (E2). Do not go deeper
than 0.010 inch. Keep a blend radius of at least
0.5 inch. The blend area shall not exceed 3.14
square-inches (the area of a 2 inch circle).
2.
Blend out nicks, scratches, and gouges on
outside diameter of lugs (3.1). Use emery cloth
(E125). Do not go deeper than 0.025 inch.
3.
Remove nicks, scratches, or gouges on adapters
(4 and 5) by light hand polishing. Use abrasive
pads (E2). Do not go deeper than 0.001 inch.
Replace adapter assemblies if defects cannot be
removed by polishing.
4.
Remove light scratches, corrosion, and nicks
from outside edge and face of plates bolted to
adapters (4 and 5). Use abrasive pads (E2). Do
not go deeper than 0.001 inch.
INSPECT
Epoxy primer (E292 or E293) is
flammable and toxic. Avoid inhaling.
Use only with adequate ventilation,
away from heat or open flame. In
case of contact, immediately flush
skin or eyes with water for at least
15 minutes. Get medical attention
for eyes.
5.
Touch up shaft (1) as needed with two coats of
epoxy primer (E292 or E293). Touch up adapters
(4 and 5) with epoxy primer (E292 or E293) and
epoxy topcoat (E166). Wear gloves (E186).
FOLLOW-ON MAINTENANCE:
Close engine transmission fairing access cover (Task
2-2).
Install engine air inlet screens (Task 4-79).
Install engine drive shaft access cover (Task 2-2).
Close pylon lower fairing (Task 2-2).
Close pylon access doors (Task 2-2).
END OF TASK
6-98


