TM 55-1520-240-23-5
6-32
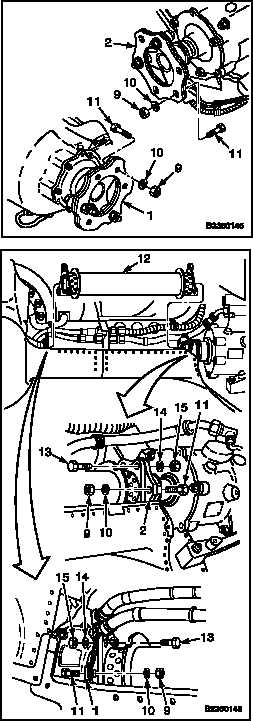
INSTALL ENGINE DRIVE SHAFT (Continued)
6-32
INSTALL SHAFT
CAUTION
Open-end wrenches or open-end
torque wrench adapters/spanners
are not to be used for torque checks
and/or removal and installation of
hardware. Damge to drive shaft can
result.
CAUTION
Exercise extreme caution while lifting
the drive shaft into the aircraft. Nicking
and denting the drive shaft or adapter
may result in the need to replace
damaged components. Support shaft
while installing to prevent damage to
adapters or shafts.
CAUTION
Do not allow bolt to turn. If bolt turns,
bolt and adapter assembly can be
damaged.
NOTE
If installing previously removed
adapter assemblies, remove the
loosely installed nut and bolt from
each.
7.
Remove one nut (9), washer (10), and bolt (11)
from each of two adapter assemblies (1 and 2).
During removal, hold head of bolt with wrench.
Do not let bolt turn when removing nut.
8.
Position shaft (12) between adapter assemblies
(1 and 2). On shafts (Without 51 ), check that leg
of shaft marked 2 is between legs of combining
transmission adapter assembly (1) marked 1
and 3 and leg of shaft marked 5 is between legs
of engine transmission adapter assembly (2)
marked 4 and 6.
9.
Coat thread of six bolts (13) with oil (E254).
Install three bolts, washers (14), and nuts (15)
at each end of shaft (12). Bolt heads shall face
each other.
10.
Coat thread of two bolts (11) with oil (E254).
Install one bolt, washer (10), and nut (9) in each
adapter assembly (1 and 2). Bolt heads shall
face away from each other. Wear gloves (E186).
6-104
Change 1