TM 55-1520-240-23-10
16-103
REMOVE EAPS CONTROL PANEL COMPONENTS
16-103
INITIAL SETUP
Applicable Configurations:
All
Tools:
Electrical Repairer’s Tool Kit, NSN 5180-00-323-4915
Materials:
None
Personnel Required:
Aircraft Electrician
Equipment Condition:
Battery Disconnected (Task 1-39)
Electrical Power Off
Hydraulic Pressure Off
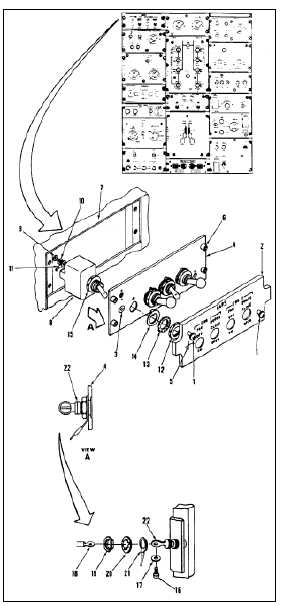
REMOVE LIGHTPLATE AS FOLLOWS:
1.
Loosen captive screws (1) from lightplate (2).
There may be an unlighted lightplate
installed at this time. However if a
lighted panel is installed caution
should be used when replacing it to
avoid damage to the light connector
(3). A white cross (5) on face
of lightplate indicates location of
electrical connector.
2.
Carefully pull lightplate (2) away from panel (4)
to separate lightplate from connector (3) behind
white cross (5).
REMOVE SWITCH, LIGHT, OR PANEL AS FOLLOWS:
3.
Turn fasteners (6) 1/4 turn counterclockwise.
4.
Pull panel (4) away from overhead panel (7) far
enough to gain access to switch (8).
5.
Tag electrical wires (9). Remove screws (10),
washers (11), and electrical wires from switch (8).
6.
Remove nut (12), lockwasher (13), and locking
ring (14) from front of panel (4). Remove switch
(8) from back of panel.
7.
Remove screw (16), washer (17), and wire (18).
Tag wire.
8.
Remove nut (19), lockwasher (20), and ground
lug (21).
9.
Remove light receptacle (22) from panel (4).
FOLLOW-ON MAINTENANCE:
None
END OF TASK
16-358