TM 55-1520-240-23-9
11-235
INSTALL TUNNEL FORWARD CONNECTING LINKS (Continued)
11-235
WARNING
FLIGHT SAFETY PARTS
This is an installation critical flight
safety part. All aspects of its assembly
and installation must be ensured.
Ensure that both rod end jam nuts are
installed and torqued.
Ensure that the rivet through the fixed
rod end insert and rod end is secure.
Ensure rivet, roll pin, and associated
hardware through rod end insert at
adjustable end of link assy is secure.
Ensure proper application of ALBI fire
retardant coatings to the link assy.
Ensure the bushing is installed on
the bolt head side of the clevis on
the aft end of this link. Omission of
this bushing will result in improper
stack-up.
Ensure proper attaching hardware
(impedance type bolt, nut, and
washers) is installed including
verification of bolt head orientation,
torque, and installation of cotter pins.
Loose attachments within flight control
primary linkage will degrade aircraft
control. Missing components will
cause loss of control.
WARNING
FLIGHT SAFETY PARTS
This is an installation critical flight
safety part. All aspects of its assembly
and installation must be ensured.
Ensure that both rod end jam nuts are
installed and torqued.
Ensure that the rivet through the fixed
rod end insert is secure.
Ensure the bushing is installed on
the bolt head side of the clevis on
the aft end of this link. Omission of
this bushing will result in improper
stack-up.
Ensure proper attaching hardware
(impedance type bolt, nut, and
washers) is installed including
verification of bolt head orientation,
torque, and installation of cotter pins.
Loose attachments within flight control
primary linkage will degrade aircraft
control. Missing components will
cause loss of control.
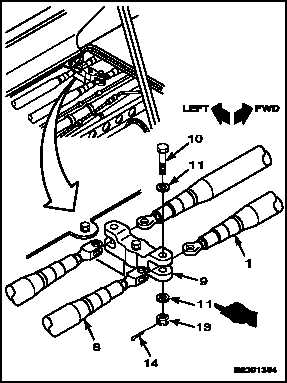
NOTE
Connecting links at STA 163.00 are
shown here. Black band end of a link
goes forward. Steel links, either end
forward.
4.
Ensure bearings are installed in control arm (9).
Position right forward connecting link (1) and
connecting link (8) in control arm (9).
5.
Install bolt (10), washer (11), and nut (13).
Torque nut to 60 to 90 inch-pounds. Install
cotter pin (14).
Change 1
11-917