TM 55-1520-240-23-5
6-46
REMOVE FORWARD TRANSMISSION PACKAGE
(Continued)
6-46
22.
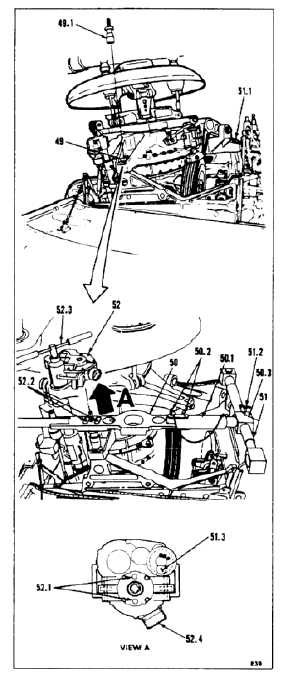
Loosen left bolt (49) as follows:
a.
Install socket assembly (49.1) on left bolt (49).
b.
Install torque applicator (50) over square
drive of socket assembly (49.1) with large
hole aft of assembly. Note THIS SIDE UP
on applicator.
c.
Install sleeve (50.1) on aft end of applicator
(50). Insert two pins (50.2) through sleeve
and adapter.
d.
Install aft end of sleeve (50.1) in center block
(50.3) of reactor (51). Install socket at end of
reactor on aft bolt (51.1).
e.
Install pin (51.2) through center block (50.3)
and applicator (50).
f.
Set selector (51.3) at bottom of torque pack
(T23) (52) to NUT OFF.
g.
Install torque pack (T23) (52) on square drive
of socket assembly (49.1). Turn pack so that
two pins (52.1) on bottom fit holes (52.2) in
applicator (50). Use tee handle (T161) (52.3)
if necessary.
Be sure handle is fully seated and
ratchet selector on torque pack is
properly set before applying torque.
Moving selector with load on torque
pack can damage unit and injure
personnel.
If handle cannot be turned, and torque
indicator needle enters red zone, do
not continue. Torque is beyond limits
of torque pack. Use alternate method
to remove bolt.
h.
Set selector switch on tee handle (T161)
(52.3) to OFF. Install handle on torque pack
(T23) (52). Turn handle counterclockwise
until torque is broken.
i.
Set switch on handle (T161) (52.3) to ON.
Turn handle clockwise until indicator (52.4)
reads 0 and torque pack is loose.
j.
Remove torque pack (52) and torque reactor
assembly (T159).
k.
Take sleeve (50.1) off applicator (50).
l.
Do not remove left bolt (49).
6-154