TM 55-1520-240-23-9
11-6.3
ISOLATION PROCEDURES FOR CHECKING CONTROLS LOOSENESS
(Continued)
11-6.3
31.
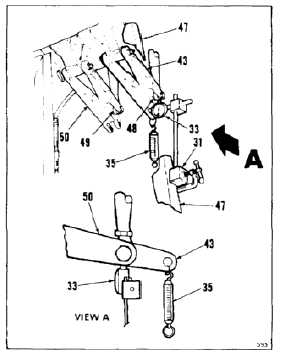
Mount support (31) on structure (47). Position
dial indicator (33) against rod end bearing (48).
Set indicator at mid-stroke.
32.
Attach dial indicating scale (35) to bellcrank (43).
Use twine (E433).
33.
Have helper pull scale (35) down until scale
indicates 10 pounds. Record indicator (33)
reading ‘C’.
34.
Pull scale (35) up until scale indicates 10
pounds. Record indicator (35) reading ‘D’.
35.
Subtract reading ‘D’ from reading ‘C’. Result
shall not be more than 0.063 inch. If more,
perform Tasks 11-7 and 11-9.
36.
Remove scale (35) from bellcrank (43).
37.
Position indicator (33) against rod end bearing
(49). Set indicator at mid-stroke.
38.
Attach scale (35) to bellcrank (50). Use twine
(E433).
39.
Repeat steps 33, 34, 35, and 36.
40.
Remove indicator (33) and support (31).
41.
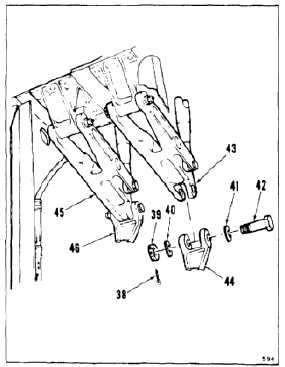
Remove nut (39), two washers (40 and 41), and
bolt (42) from link (44).
42.
Position link (44) on bellcrank (43). Install bolt
(42), two washers (41 and 40) and nut (39).
43.
Torque nut (39) to 30 to 45 inch-pounds. Install
cotter pin (38).
44.
Repeat steps 41 and 42 for link (46) and
bellcrank (45).
45.
Check two bolts (42 and 51). Bolts shall not
rotate with torque less than 10 inch-pounds.
There shall be no axial looseness. If bolt rotates
or is loose, add washer under nut and repeat
step 43.
11-31


