TM 55-1520-240-23-6
7-333
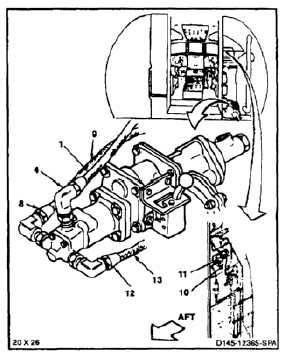
BLEED UTILITY HYDRAULIC WINCH SYSTEM
(Continued)
7-333
6.
Connect hose (1) to elbow (4).
7.
Apply hydraulic power. Set test stand to 5 psi.
8.
Loosen nut (8) of IN hose (9).
9.
Turn knob (10) of control valve (11) forward until
fluid flows from hose (9). Allow fluid to flow until
air free. Use container and cloths (E120) for
spilled fluid. Use gloves (E186).
9.1.
Tighten nut (8) of IN hose (9).
10.
Turn knob (10) to off position.
11.
Loosen nut (12) of hose (13).
12.
Turn knob (10) aft until fluid flows from hose (13).
Allow fluid to flow until air free. Use container and
cloths (E120) for spilled fluid. Use gloves (E186).
12.1.
Tighten nut (12) of hose (13).
13.
Turn knob (10) to off position.
14.
Set stand pressure to 3000 psi.
Cable must be manually controlled
during reel-in and reel-out to prevent
entanglement, snags, and injury to
personnel.
15.
Turn knob (10) aft. Allow about 10 feet of cable
to reel-out.
16.
Turn knob (10) forward. Allow cable to reel-in.
17.
Remove hydraulic power.
FOLLOW-ON MAINTENANCE:
Disconnect hydraulic test stand from ground service
panel (Task 1-38).
Install heater compartment acoustic blanket (Task
2-210).
Remove electrical power (Task 1-37).
END OF TASK
7-1228