TM 55-1520-240-23-5
6-7
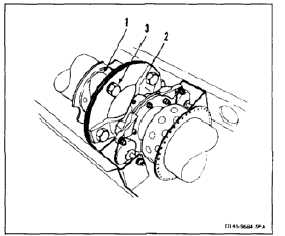
INSPECT FORWARD DRIVE SHAFT ADAPTER ASSEMBLY
(Continued)
6-7
NOTE
Inspect all adapter assemblies in
same way. Typical assembly shown.
Use magnifying glass to inspect.
Rotate adapter assembly as needed
for complete check.
If more than one bolt is loosened
or removed from adapter assembly,
the adapter assembly must be
rebalanced.
1.
Inspect adapter (1) and plates (2) for cracks. Pay
special attention to areas around bolts (3). There
shall be no cracks. If a crack is suspected in
adapter or plate, refer to TM 1-1520-253-23.
2.
Inspect adapter (1) as follows:
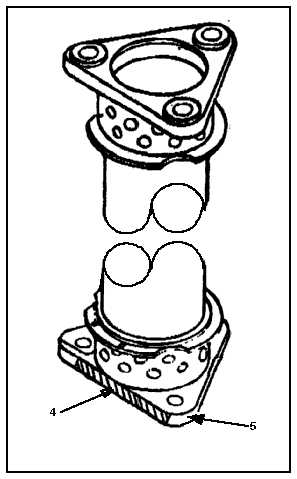
a.
Nicks, gouges, score marks and scratches
that do not exceed 0.010 inch in depth on
adapter surfaces between lugs (4), including
balancing flanges can be blended per Task
6-11.
b.
Nicks, gouges, score marks and scratches
that do not exceed 0.020 inch in depth on
adapter, adjacent to the bolt hole outer lug
surfaces (5) can be blended per Task 6-11.
c.
Light damage such as nicks, score marks,
and scratches on the adapter external
surfaces that do not exceed 0.005 inch in
depth (except for the bolt holes) can be
blended per Task 6-11.
3.
Inspect plates (2). There shall be no sharp dents
or distorting. There shall be no nicks on inside
edge. Feel for nicks with pointed scriber.
4.
Inspect outside edge of plates (2) for light
scratches, fretting corrosion or nicks. Repair
damage (Task 6-11). Use abrasive paper (E15).
FOLLOW-ON MAINTENANCE:
Close aft pylon lower fairing (Task 2-2).
Close aft pylon doors (Task 2-2).
Close forward transmission fairing work platforms
(Task 2-2).
Close forward drive shaft tunnel access covers (Task
2-2).
END OF TASK
6-24