TM 55-1520-240-23-5
6-92
REMOVE AFT TRANSMISSION
(Continued)
6-92
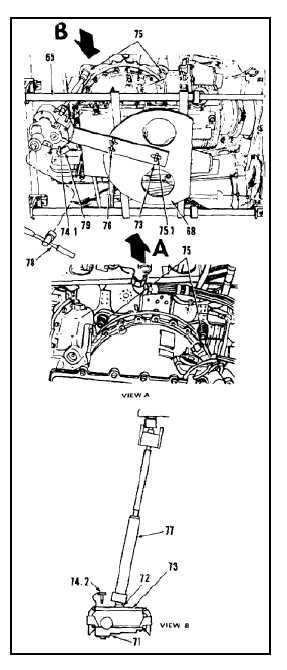
29.
Loosen each of four transmission mounting nuts
(75) as follows:
NOTE
Removal of forward left nut shown
here.
a.
Loosen knob (75.1).
b.
If loosening a forward nut (75), position
support (73) directly under nut to be
loosened. If loosening an aft nut, position
support straight out to side of nut to be
loosened. Install and tighten two knob
assemblies (76) through support and base
plate (68).
c.
Tighten knob (75.1).
NOTE
Torque shaft is spring-loaded and
compresses for installation.
d.
Place one end of torque shaft (77) on nut
(75). Place other end on adapter shaft (72).
Be sure handle is fully seated and
ratchet selector on torque pack is
properly set before applying torque.
Moving selector with load on torque
pack can damage unit and injure
personnel.
e.
Set selector switch on tee handle (T161) (78)
to OFF. Install tee handle on torque pack
(T23) (71). Turn handle counterclockwise
until torque is broken.
f.
Set selector switch on tee handle (78) to ON.
Turn handle clockwise until torque indicator
(74.1) reads 0 and torque pack (71) is loose.
g.
Remove torque shaft (77).
29.1.
Loosen thumb screws (74.2) and release hooks
(73.1). Remove torque pack (71) from support
(73).
29.2.
Remove torque adapter (65) from helicopter
structure.
29.3.
Remove four nuts (75).
6-348


