TM 55-1520-240-23-4
5-126.2
INSTALL SWASHPLATE ROTATING RING INTERRUPTER BRACKETS
(AVIM) (Continued)
5-126.2
1.
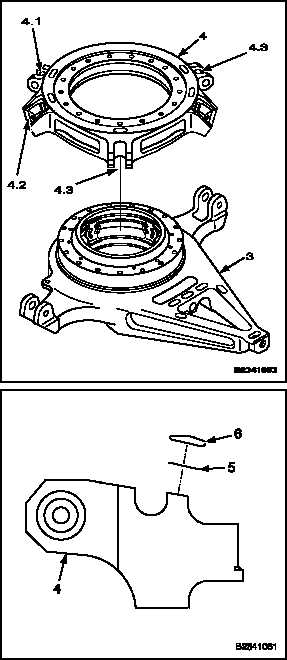
Carefully lift rotating ring assembly (4) from
stationary ring (3). Use a mallet to separate the
rings, if needed.
2.
Mark bracket locations on the bottom of rotating
ring (4).
NOTE
Three brackets are installed on
forward swashplate only. One bracket
has two interrupters. The dual
interrupter is installed at the first pitch
change link mount (4.1) (clockwise)
from the forward drive arm mounting
lug (4.2). The single interrupters
are installed at the remaining pitch
change link mounting locations (4.3).
3.
Sand rotating ring surface lightly to remove
adhesive. Use abrasive paper (E7).
4.
Sand bracket surface lightly to remove adhesive.
Use abrasive paper (E6).
5.
Wipe sanded area with cloth (E120) damp with
acetone (E20). Wipe dry with a clean cloth
before acetone evaporates. Wear gloves (E186).
6.
Cut scrim cloth (E326) to size of brackets.
7.
Mix a small amount of adhesive (E43) as follows:
WARNING
Adhesive (E43) is toxic. It can
irritate skin and cause burns. Avoid
inhaling. Use only with adequate
ventilation. Avoid contact with skin,
eyes, or clothing. In case of contact,
immediately flush skin or eyes with
water for at least 15 minutes. Get
medical attention for eyes.
a.
If adhesive (E43) is used, mix 5 parts of
white base and 7 parts of gray hardener.
Use trip balance. Stir in polyethylene cup
(E157) with wood spatula (E424) until color is
uniform. Use gloves (E186).
NOTE
Working life of adhesive (E43) is
about 30 minutes.
8.
Apply even coat of adhesive (E42) to mating
surfaces of brackets (6) and rotating ring (4).
Wear gloves (E186).
9.
Press scrim cloth (E326) (5) into adhesive on
rotating ring by hand.
10.
Apply even coat of adhesive over scrim cloth
(E326) (5). Do not allow bubbles or lumps to
form. Wear gloves (E186).
5-708
Change 2


