TM 55-1520-240-23-4
5-25
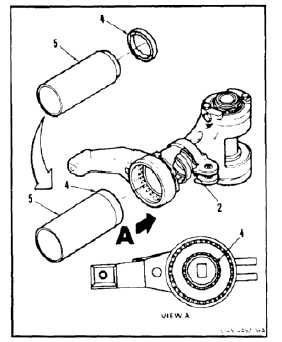
INSTALL PITCH HOUSING SEALS
(Continued)
5-25
NOTE
Task is same to install seals in all six
pitch-varying housings.
Adhesive (E63.1) or sealant (E340.3)
is authorized specifically for the
installation of pitch housing seal.
1.
Clean inside of housing (1), outboard of seal seat
(2). Use cloth (E120) moist with solvent (E161).
Wear gloves (E184.1).
Do not contaminate bearings. Dirt can
damage bearing surfaces.
2.
Clean oil or dirt from seal seats (2 and 3). Use
cloth (E120) damp with methyl-ethyl-ketone
(E244). Wear gloves (E184.1).
Do not block drain hole. Oil can not
drain freely if hole is blocked.
2.1.
Inspect seats (2 and 3) (Task 5-24.1).
3.
Prime inside of housing (1), outboard of seal seat
(2). Use epoxy primer (E292.1). Wear gloves
(E184.1).
INSTALL OUTBOARD SEAL
Do not allow adhesive to contact
bearing. Adhesive can adhere to
bearing.
NOTE
All sealants and adhesives have
different cure times. When using
sealants and adhesives, the directions
on the container are to be considered
minimum cure time before full
operation of the aircraft.
4.
Apply adhesive (E63.1) or sealant (E340.3) to
outboard seal seat (2).
5.
Position outboard seal (4) on drift (T11) (5).
6.
Install outboard seal (4) in seal seat (2). Remove
drift (T11) (5).
7.
Wipe off excess adhesive around outboard seal
(4). Use cloth (E120) damp with solvent (E162).
Wear gloves (E184.1).
5-135