TM 55-1520-240-23-9
11-251
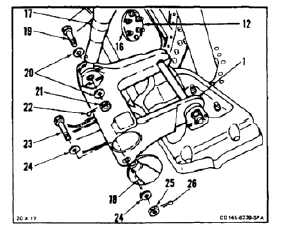
INSTALL AFT BELLCRANK STA 482
(Continued)
11-251
14.
Seal edge (16) of access (12) with sealant
(E336). Wear goggles to protect eyes. Wear
gloves (E186).
15.
Untie connecting links (17 and 18).
16.
Position connecting link (17) in bellcrank (1).
17.
Install bolt (19), two washers (20), and nut (21).
Torque nut to 60 to 90 inch-pounds.
18.
Check bolt (19). Bolt shall not rotate with torque
less than 10 inch-pounds. Bolt shall have no
axial looseness. If bolt rotates or is loose, add
washer under nut. Repeat step 17.
19.
Install cotter pin (22).
20.
Position connecting link (18) in bellcrank (1).
21.
Install bolt (23), two washers (24), and nut (25).
Torque nut to 60 to 90 inch-pounds.
22.
Check bolt (23). Bolt shall not rotate with torque
less than 10 inch-pounds. Bolt shall have no
axial looseness. If bolt rotates or is loose, add
washer under nut. Repeat step 21.
23.
Install cotter pin (26).
NOTE
If connecting links are changed in
length, perform neutral rig check
(Task 11-33).
INSPECT
FOLLOW-ON MAINTENANCE:
Connect aft servocylinder connecting links (Task
11-193).
Perform operational check of flight controls (TM
55-1520-240-T).
Close pylon work platforms (Task 2-2).
Close cargo ramp (Task 2-2).
END OF TASK
11-975