TM 55-1520-240-23-9
11-71
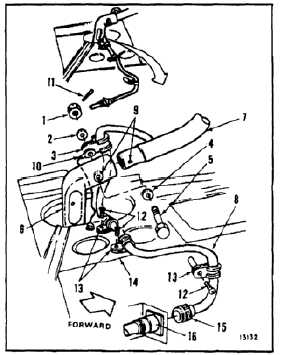
INSTALL PILOT’S PITCH AND ROLL CONTROL STICK
(Continued)
11-71
1.
Remove nut (1), washer (2), clamp (3), washer
(4), and bolt (5) from socket (6).
2.
Insert pitch and roll control stick (7), cable (8) on
left, in socket (6). Align holes (9).
3.
Install cable (8), close to stick (7) in clamp (3),
bolt hole aft, with cable down through clamp.
FLIGHT SAFETY PARTS
This is an installation critical flight
safety part. All aspects of its assembly
and installation must be ensured at
each joint connection and mounting to
the adjacent component.
Ensure elbow assembly is properly
attached and secured to the tube.
Ensure the cyclic grip assy is properly
attached to the elbow assembly.
Ensure rubber grommet is installed
at wire bundle exit to prevent wire
chafing.
Ensure connector is properly installed.
Ensure proper attaching hardware
(impedance type bolt, nut, and
washers) is installed including
verification of bolt head orientation,
torque, and installation of cotter pins.
Loose attachments within flight control
primary linkage will degrade aircraft
control. Missing components will
cause loss of control.
Epoxy primer (E292) is flammable
and toxic. It can irritate skin and
cause burns. Use only with adequate
ventilation, away from heat and
open flame. Avoid contact with skin,
eyes, or clothing. In case of contact,
immediately flush skin or eyes for
at least 15 minutes. Get medical
attention for eyes.
4.
Apply coat of epoxy primer (E292) to bolt (5) and
washer (4). Wear gloves (E184.1). Install bolt
and washer on outboard side of socket (6) while
primer is wet.
Bonding jumper and cable must not
restrict control stick travel. Restricted
control stick travel during flight can
be dangerous.
5.
Install bonding jumper (10), clamp (3), washer
(2), and nut (1) on bolt (5).
6.
Tie bonding jumper (10) to cable (8) with three
ties. Use twine (E433).
Sealant (E340) may be toxic, can
irritate skin and cause burns. Avoid
contact with skin, eyes, or clothing.
Immediately flush skin or eyes with
water for at least 15 minutes. Get
medical attention for eyes.
7.
Torque nut (1) to 15 to 20 inch-pounds. Install
cotter pin (11). Apply sealant (E340) over nut
and cotter pin. Cover all sharp edges.
8.
Remove three screws (12) and three clamps (13)
from structure (14). Mount clamps on cable (8),
with screw holes aft. Install clamps and screws.
9.
Connect connector (15) to receptacle (16).
INSPECT
11-315


