TM 55-1520-240-23-9
11-255
INSTALL AFT FUSELAGE RIGHT CONNECTING LINK
(Continued)
11-255
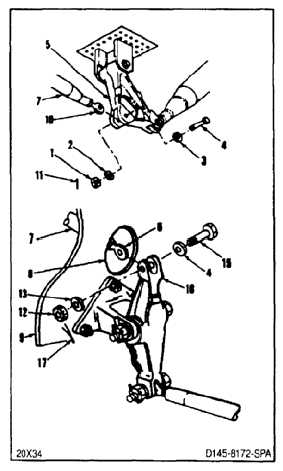
2.
Insert end (6) of connecting link (7) through hole
(8) in structure (9). Position end (10) of link in
bellcrank (5).
3.
Install bolt (4), two washers (3 and 2), and nut
(1) in bellcrank (5).
4.
Torque nut (1) to 60 to 90 inch-pounds. Install
cotter pin (11).
5.
Working from aft upper fuselage, remove nut
(12), two washers (13 and 14), and bolt (15) from
bellcrank (16).
6.
Position end (6) of link (7) in bellcrank (16).
Install bolt (15), two washers (14 and 13), and
nut (12) in bellcrank.
7.
Torque nut (12) to 60 to 90 inch-pounds. Install
cotter pin (17).
8.
Check two bolts (4 and 15). Bolts shall not rotate
with torque less than 10 inch-pounds. There
shall be no axial looseness, bolt rotates or is
loose, add washer under nut and repeat step 4
or 7.
NOTE
If connecting links are changed in
length, perform neutral rig check
(Task 11-33).
INSPECT
FOLLOW-ON MAINTENANCE:
Remove safety blocks (Task 11-29).
Perform neutral rig check (Task 11-33).
Perform operational check of flight control system
(TM 55-1520-240-T).
Close cargo ramp (Task 2-2).
Close pylon doors (Task 2-2).
END OF TASK
11-985


