TM 55-1520-240-23-8
10-27
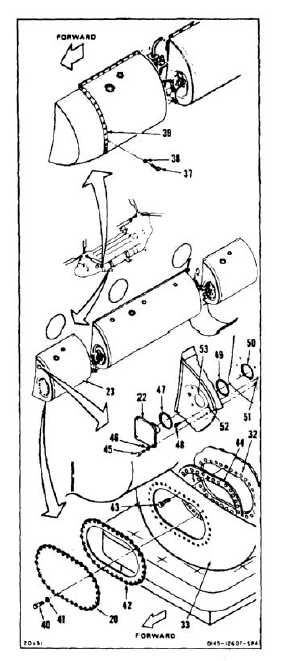
TEST FORWARD FUEL TANK AFTER INSTALLATION
(Continued)
10-27
11.
Remove 54 screws (37) and washers (38) from
splice plate (39). Remove splice plate.
12.
Lower forward tank (23) (Task 10-26).
13.
Check inside of forward access door (20) as
follows:
a.
Remove 30 bolts (40) and washers (41).
b.
Remove door (20) and gasket (42).
c.
Remove four screws (43). Remove gasket
(44).
d.
Lightly smear both sides of gasket (44) with
petrolatum (E274).
e.
Position gasket (44) between fuel pod (33)
and fuel cell (32) at end of fuel pod.
f.
Align fuel pod (33), gasket (44) and fuel cell
(32). Install four screws (43).
g.
Install access door (20) (Task 10-70).
h.
Repeat steps 6 and 7.
14.
Check inside of forward closure plate (22) as
follows:
a.
Remove four bolts (45), washers (46), and
packing (47).
b.
Remove two screws (48) and packing (49).
c.
Coat packing (49) with petrolatum (E274).
Install packing carefully in annular groove
of flange (50). Make sure packing is not
disturbed during positioning of fuel cell (32)
in pod (33).
d.
Align holes (51) with holes (52). Install two
screws (48).
e.
Coat packing (47) with petrolatum (E274).
Install packing carefully in annular groove of
cell flange (53). Position closure plate (22)
on tank pod (33).
f.
Install four bolts (45) and washers (46).
Torque bolts to 60 to 80 inch-pounds.
g.
Repeat steps 6 and 7.
15.
Repeat steps 13 and 14 at aft end of tank (23).
10-129