TM 55-1520-240-23-8
10-22
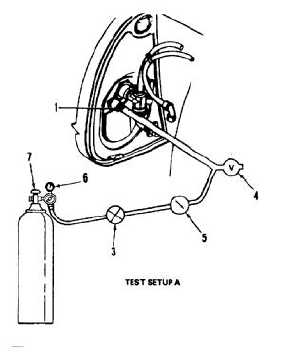
TEST MAIN FUEL TANK AFTER INSTALLATION
(Continued)
10-22
1.1.
Ensure nitrogen/air supply regulator output
pressure is 0 psi.
2.
Make sure valves (3 and 4) are closed. Connect
test setup to fitting (1). Open nitrogen/air supply
source and regulate pressure to 2 psi at tank
regulator (6).
3.
Open valve (3) and allow pressure to stabilize.
Structural damage to aircraft may
occur if more than 4.0 psi is applied.
3.1.
Increase pressure at regulator (6) and allow to
stabilize at 3.0 psi. Close valve (3).
4.
Wait 5 minutes. Check gage (5). If gage
indicates 2.5 psi or more, go to step 7.
5.
If gage (5) reads less than 2.5 psi, check test
setup connections at valves (3 and 4), and gage
(5). Use mixture of soap (E353) and water, and
brush (E85). Keep system under pressure for 15
minutes. If bubbles grow in size, connection is
leaking. Tighten connections or replace packings
as needed. Also check all joints, seams, and
cast components.
6.
Repeat steps 3 thru 4. If pressure is less than
2.5 psi, perform steps 7 and 8 and remove fuel
lines (Task 10-41). Check lines and connections.
Replace packing if needed. Install lines (Task
10-42). Repeat steps 3 thru 5.
7.
Shut off nitrogen/air supply (7). Open valve (4) to
reduce pressure to 0 psi. Close valve (4).
8.
Disconnect test setup from fitting (1). Cap fitting.
10-92