TM 55-1520-240-23-4
5-70
REPAIR BLADE FAIRING — DOUBLE SKIN
(Continued)
5-70
2.
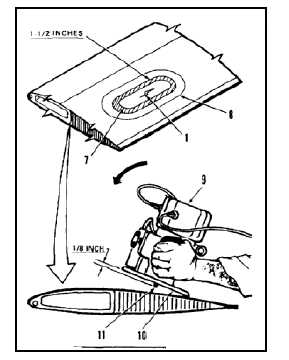
Mark damage areas (1) on fairing (2). If damage
areas vary in size, or are offset, proceed as
follows:
a.
Cover fairing (2) on side with greatest
damage. Use template paper (E263) (3).
Align one edge with trailing edge (4). Apply
tape (E388) (5) as hinge.
b.
Draw outline (6) of damaged area (1) on
paper (E263) (3). Use pencil compass
straightedge, if needed.
c.
Cut out paper (E263) (3) on outline (6).
d.
Flip paper (E263) (3) around other side of
fairing (2).
e.
Check that cutout (6) covers damage area on
other side of fairing (2). If not, enlarge cutout
(6) as required.
f.
Draw outline (7) of cutout (6) on both sides
of fairing.
3.
Remove finish 1-1/2 inches outside of outline (7)
around damage. Use sanding block and abrasive
paper (E6). Use acetone (E20), if needed to
soften finish. Complete finish removal with
abrasive paper (E7). Do not sand through wire
mesh. Wear gloves (E186).
4.
If wire mesh diverter must be replaced, expose
wire mesh 1-1/2 inches outside of damaged
area.
5.
If router (9) is used to remove damaged skin,
proceed as follows:
a.
Draw line (8) around outline (7). Use pencil
compass and straightedge. If damaged area
(1) will not support compass point, cover
area. Use template paper (263) and masking
tape (E388). Remove paper and tape.
NOTE
Using a 6 inch diameter router base
and 1/2 inch bit, line (8) should be
2-3/4 inches outside of outline (7).
5-389