TM 55-1520-240-23-4
5-67.1.1
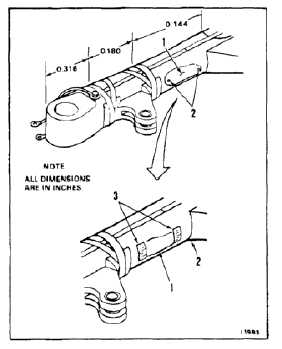
REPAIR BLADE SHANK VOIDS
(Continued)
5-67.1.1
1.
Determine size of void (1). Use coin tapping
(Task 5-63). Outline void area with a marking
pencil (E271).
2.
Drill a hole (2) through unbonded material at
each end of void (1). Do not drill past void. Use a
No. 40 drill bit and a hand drill. Set drill depth so
that the dimensions noted in the illustration will
not be exceeded in the areas shown.
3.
Blow air at no more than 20 psig into one hole
(2). Check that air escapes from the other
hole. If not, drill more holes so that air will pass
through void (1).
4.
Clean void (1). Use acetone (E20) from a plastic
squeeze bottle (E366). Flush void until acetone
runs clear.
Exceeding 20 psig may damage
blade.
5.
Blow clean dry air through void (1) to clear it of
acetone. Do not exceed 20 psig.
6
Prepare an adhesive mixture as follows:
a.
Weigh 2 parts of adhesive (E47.1) and 1
part curing agent (E158). Use a trip balance.
b.
Mix in polyethylene cup (E157). Use wood
spatula (E424).
7.
Inject adhesive into void (1) through one hole (2).
Use a hypodermic syringe (E380). When void
is full, shown by adhesive coming out the other
hole, cover all holes. Use tape (E399) (3).
8.
Let adhesive cure for 36 hours at 70º - 80ºF
(21º - 27ºC).
9.
Remove tape (3).
FOLLOW-ON MAINTENANCE:
None
END OF TASK
5-339