TM 55-1520-240-23-5
6-8
INSTALL FORWARD TRANSMISSION ADAPTER ASSEMBLY
(Continued)
6-8
Dry cleaning solvent (E162) is
flammable and toxic. It can irritate
skin and cause burns. Use only in
well-ventilated area, away from heat
and open flame. In case of contact,
immediately flush skin or eyes with
plenty of water for at least 15 minutes.
Get medical attention for eyes.
NOTE
If more than one bolt is loosened or
removed from the adapter assembly,
the adapter assembly must be
rebalanced.
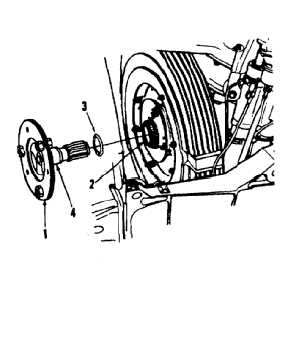
1.
Clean splines of adapter assembly (1) and input
shaft (2). Use dry cleaning solvent (E162) and
clean cloths (E120). Using abrasive pad (E2)
thoroughly remove any fretting corrosion from
adapter surface (4) and mating surface of input
shaft. Wear gloves (E186).
2.
Coat packing (3) with grease (E190.1). Install
packing on adapter assembly (1).
INSPECT
3.
Pack splines of input shaft (2) and adapter
assembly (1) with grease (E190.1).
4.
Completely cover adapter surface (4) with grease
(E190.1).
5.
Install adapter assembly (1) in input shaft (2).
Make sure assembly is fully seated. Wipe off
excess grease with cloth (E120).
FOLLOW-ON MAINTENANCE:
Install No. 1 and No. 2 drive shafts (Tasks 6-17 and
6-18).
Phase rotary-wing blades (Task 6-28).
Install forward transmission oil cooler air inlet duct
(Task 6-122).
Close forward transmission right fairing (Task 2-2).
END OF TASK
6-26