TM 55-1520-240-23-9
11-187
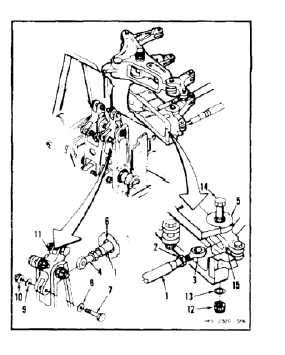
INSTALL MIXING LINKAGE CONNECTING LINKS
(Continued)
11-187
Make sure bushings are in bellcranks
before installing bolts or component
damage will result.
To obtain proper clamp-up and
prevent damage to controls, if a light
washer is used under nut, prior to
applying torque make sure the washer
does not hang up in the bolt retaining
feature groove.
NOTE
Impedance bolts are installed in flight
control connections. These bolts are
self-retaining and require a special
nut and torque (Task 1-13).
INSTALL LOWER OUTBOARD LINK
1.
If lower outboard link (1) is a replacement, loosen
nut (2). Turn rod end (3) 90º to rod end (4).
Torque nut (2) to 350 inch-pounds.
2.
Insert link (1) through bellcrank (5) and access
hole.
3.
Remove bolt (7), washer (8 and 9), and nut (10)
from bellcrank (11).
FLIGHT SAFETY PARTS
This is an installation critical flight
safety part. All aspects of its assembly
and installation must be ensured.
Ensure that both rod end jam nuts are
installed and torqued.
Ensure that the rivet through the fixed
rod end bearing is secure.
Ensure larger diameter bore rod end
bearing is facing aft.
Ensure proper attaching hardware
(impedance type bolt, nut, and
washers) is installed including
verification of bolt head orientation,
torque, and installation of cotter pins.
Loose attachments within flight control
primary linkage will degrade aircraft
control. Missing components will
cause loss of control.
4.
Position link (1) in bellcrank (11). Install bolt (7),
washers (8 and 9), and nut (10) in bellcrank. Do
not torque nut at this time. Remove tag.
5.
Remove nut (12) and washer (13) from bolt (14).
6.
Raise bolt (14) from bellcrank (5). Position link
(1) in bellcrank (15).
7.
Install bolt (14), washer (13), and nut (12). Do
not torque nut at this time.
11-737