TM 55-1520-240-23-9
11-189
INSTALL FIRST STAGE MIXING ASSEMBLY
(Continued)
11-189
53.
Remove nut (73), two washers (74 and 75), and
bolt (76) from bellcrank (8).
54.
Position roll link (77) in bellcrank (8).
55.
Install bolt (76), two washers (75 and 74), and
nut (73). Do not torque nut at this time.
56.
Remove nut (78), two washers (79 and 80), and
bolt (81) from bellcrank (3).
57.
Position yaw link (82) in bellcrank (3).
58.
Install bolt (81), two washers (80 and 79), and
nut (78). Do not torque nut at this time.
59.
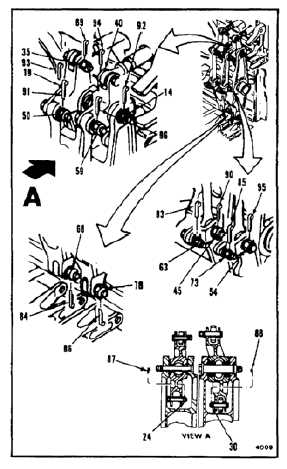
Remove all tags.
60.
Torque nuts (63, 68, 73, and 78) to 30 to 45
inch-pounds. Install cotter pins (83, 84, 85, and
86).
61.
Torque nuts (24, 30, 35, and 40) to 60 to 90
inch-pounds. Install cotter pins (87, 88, 89, and
94).
62.
Torque nuts (14 and 19) to 85 to 125
inch-pounds. Install cotter pins (92 and 93).
63.
Check inside diameter of nuts (45, 50, 54, and
59). If ID is 5/16 inch torque nuts to 60 to 90
inch-pounds. If ID is 9/16 inch, torque nuts to
85 to 200 inch-pounds. Install cotter pins (90,
91, 95, and 96).
11-761