TM 55-1520-240-23-9
11-52.1
ADJUST FIRST AND SECOND-STAGE BELLCRANK THRUST UP INBOARD AND YAW
RIGHT OUTBOARD STOPS
(Continued)
11-52.1
Do not stand, kick, or induce lateral
loads to the thrust idler. A cracked
arm will cause in-flight failure resulting
in disconnecting the thrust cockpit
driver actuator (CCDA) and the
droop eliminator potentiometers
(Without 74 ) or thrust control position
transducer (With 74 ).
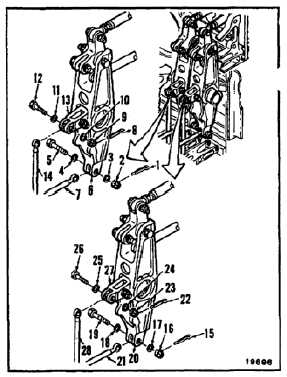
1.
Working in passageway, remove cotter pin (1),
nut (2), two washers (3 and 4), and bolt (5) from
bellcrank (6). Disconnect link (7) from bellcrank.
Tie link away from bellcrank. Use twine (E433).
2.
Remove cotter pin (8), nut (9), two washers
(10 and 11), and bolt (12) from bellcrank (13).
Disconnect link (14) from bellcrank. Tie link away
from bellcrank. Use twine (E433).
3.
Remove cotter pin (15), nut (16), two washers
(17 and 18), and bolt (19) from bellcrank (20).
Disconnect link (21) from bellcrank. Tie link away
from bellcrank. Use twine (E433).
4.
Remove cotter pin (22), nut (23), two washers
(24 and 25), and bolt (26) from bellcrank (27).
Disconnect link (28) from bellcrank. Tie link away
from bellcrank. Use twine (E433).
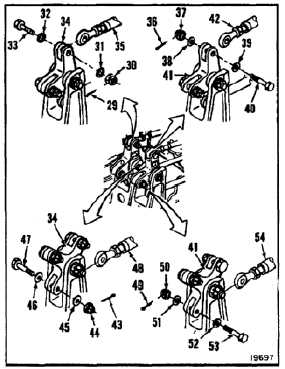
5.
Have helper working from forward left work
platform, remove cotter pin (29), nut (30), two
washers (31 and 32), and bolt (33) from bellcrank
(34). Disconnect link (35) from bellcrank. Tie link
away from bellcrank. Use twine (E433).
6.
Remove cotter pin (36), nut (37), two washers
(38 and 39), and bolt (40) from bellcrank (41).
Disconnect link (42) from bellcrank. Tie link away
from bellcrank. Use twine (E433).
7.
Remove cotter pin (43), nut (44), two washers
(45 and 46), and bolt (47) from bellcrank (34).
Disconnect link (48) from bellcrank. Tie link away
from bellcrank. Use twine (E433).
8.
Remove cotter pin (49), nut (50), two washers
(51 and 52), and bolt (53) from bellcrank (41).
Disconnect link (54) from bellcrank. Tie link away
from bellcrank. Use twine (E433).
11-230