TM 55-1520-240-23-1
1-16
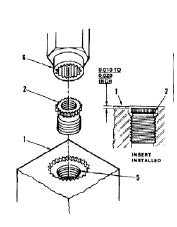
REPLACE SCREW-THREAD INSERT (AVIM)
(Continued)
1-16
When cleaning with compressed air,
debris thrown by pressure can injure
eyes. Do not use pressure over 30
psi. Wear eye protection.
6.
Clean debris from hole (5) in housing (1). Use
low-pressure compressed air.
NOTE
Install same size insert as removed.
7.
Coat outside of insert (2) with primer (E292.1).
Wear gloves (E184.1).
Insert can be damaged if not installed
to correct depth.
8.
Install insert (2) with special wrench (6). Use
wrench R1106W for inserts MS51991-206 and
MS51991-206L. Use wrench R1108W for insert
MS51991-208. Make sure top of insert is 0.010
to 0.020 inch below surface of housing (1).
9.
Coat lock ring (3) with primer (E292.1). Wear
gloves (E184.1).
10.
Install lock ring (3) around insert (2) undercut
(7) toward housing (1). Align serrations (8) with
serrations on housing and insert as much as
possible.
11.
Drive lock ring (3) around insert (2) and into
housing (1) with special drive tool (9). Use
tool R-206D for inserts MS51991-206 and
MS51991-206L. Use tool R208-D for insert
MS51991-208.
12.
Remove any protective covering from area of
insert (2) installation.
INSPECT
FOLLOW-ON MAINTENANCE:
None
END OF TASK
1-29/(1-30 blank)